SSD + HDD on (almost) any Laptop
With the prices of SSD’s dropping and stupid people dumping their desktop computers in favor of cheap, shitty and low end laptops, OEMs are making the gap between good hardware and crappy but affordable laptops even larger. This leaves power users (who not necessarily have tons of cash) with not much options for buying a good laptop. Since they are focusing on low energy consumption and slim designs and because performance is not an issue for most people (they barely understand the difference between RAM and HDD) there’s little to no interest on selling balanced systems for people who actually care and do need good performance (but for real stuff they rather use their desktop computers). With that being said, it brings me to the point of this post. When buying a laptop you may expect only 2 or 3 possible upgrades: RAM, HDD and battery. At this point, many vendors are soldering RAM into the motherboard and getting even slimmer hard drives, leaving your upgrade options more limited. This is fine for most people. But I’m not most people and I don’t give a damn what the vendor thinks is right for me.
This guide is only good for those laptops that still come with an optical drive. Chances are that if your laptop doesn’t have one, then you either:
- Shouldn’t be here, get a mac maybe?
- You have a Facebook-only computer and/or all you do with it is covered by any modern web browser (you probably use Internet Explorer or Safari, hell, you might have managed to bring Netscape back)
Now, I’m not saying that a computer requires an optical drive. It’s just that most laptops that don’t are cheap models where the even cheaper optical drive was removed to reduce weight and production costs and there’s no real reason not to include it. I don’t use an optical drive myself for much, but that’s not the point here.
What we’ll do here is take out the optical drive on a laptop and replace it with a hard drive, allowing us to use 2 SATA devices at once (Be it an SSD + HDD, SSD + SSD, HDD + HDD, or whatever). There are a few reasons why someone would want to do this. First of all, SSD’s are cheaper now but that doesn’t make them cheap either. At least not compared to the storage space a hard drive gives you. At the time of writing, a 2TB Laptop HDD costs around $120 USD, the same as a 250GB SSD. You get 8 times as much storage for the same price when buying an SSD. Most people would be fine with a 250GB SSD but not me. Not many other people like to store a bunch of stuff in their computers. It might be laziness, an actual need, or whatever, but the point is, there are people who would like to take advantage of an SSD’s benefits but are not able to sacrifice storage space to do so. Carrying an external hard drive is an option, but it’s annoying, you can drop it accidentally, you lose an USB port while working with it and the list keeps going. I like to have everything in one place.
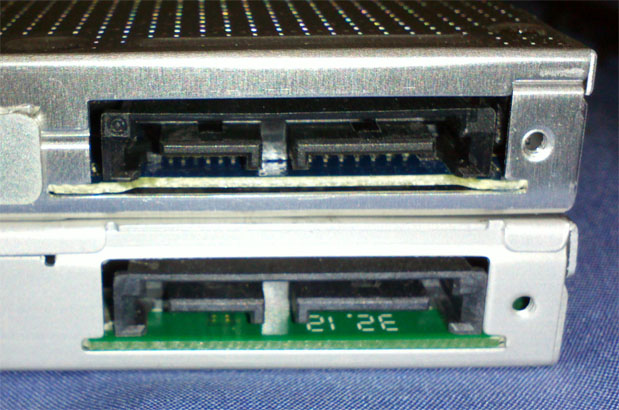
The secret to getting the best from both worlds, is a cheap Chinese device. It’s an adapter that will allow you to put a standard SATA device on the optical drive space of almost any laptop. You’ll obviously lose the ODD but if you’ve got this far in the post, I don’t think that’s something you care about. This adapters cost about $10 on eBay, but you might be able to get them even cheaper. Other stores sell them at higher prices, but there’s no point as they are not better quality or have any differences that matter other than a branded box or manuals that don’t say much. You may look for them as “hdd optical drive caddy”. As far as I know, there are 3 different models. What varies between them is the height (one is 12.7mm tall and the other is 9.5mm) and one made for macbooks. I won’t cover the latter as Apple users are already hopeless, and there’s no point on making this upgrade. The caddy’s height is something to take into account as depending on how old your laptop is, its optical drive might have a different height. Here’s what they look like:
So, before we start you have to identify what caddy size you’ll need. For that you have to take the ODD out of your laptop. I won’t cover the details on how to do this, as there are a lot of guides out there for specific laptop models, and most of them will come out with a single screw on the bottom of the laptop. For this guide, I’ll be using my own laptop, a DV6-6185LA from HP. This laptop comes with an older 12.7mm optical drive, which is the easiest to find online and usually the cheapest. 

If you look underneath the laptop, it’s easy to identify both devices by taking off the cover. Some vendors won’t make it this easy and you might end up taking apart the whole laptop before you can see the hard drive, but as long as you can take out the optical drive you might not have to take apart the whole thing. After we remove the optical drive you have to measure it with a ruler to make sure the caddy’s height is the same as your computer’s slot. And please, use millimeters, not inches. I already have the caddy, so I’ll only show the comparison. As you can see, the back matches perfectly. The optical drive is on the top, while the ODD is on the bottom. As a side note, you have to make sure you get a SATA caddy. There are still IDE caddys out there and unless your computer is about 10 years old, chances are that you are not using one of those.
Now you have 2 options, but that will depend on your laptop. You may install your SSD on the caddy or replace HDD for the SSD and put the SSD on the caddy. Both methods will work, but I’ve tried this on a few laptops where it wouldn’t allow me to boot directly into the caddy, forcing me to install the bootloader into the hard drive (and I didn’t want that). What I want to achieve here is an OS install on the SSD and personal folders and everything else stored on the HDD. Now, you have to consider that most vendors will put some sort of cushion or rubber thing to protect the hard drive from external vibration and impacts, so putting the HDD in the caddy might not be the best idea if you are not good at not dropping your stuff. I’ll do it because it’s the only way I’ve seen that works on any laptop.
So, after taking it all apart, here’s what we have:
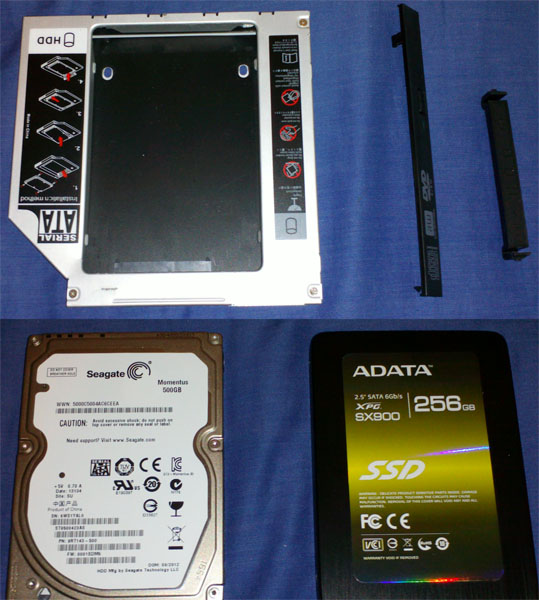
Here, I’m using a Seagate 500GB HDD and an A-Data 256GB SSD. The thing in the top is the caddy, of course. Now that everything is out, I’ll install the SSD where the hard drive was and then put the HDD into the caddy:
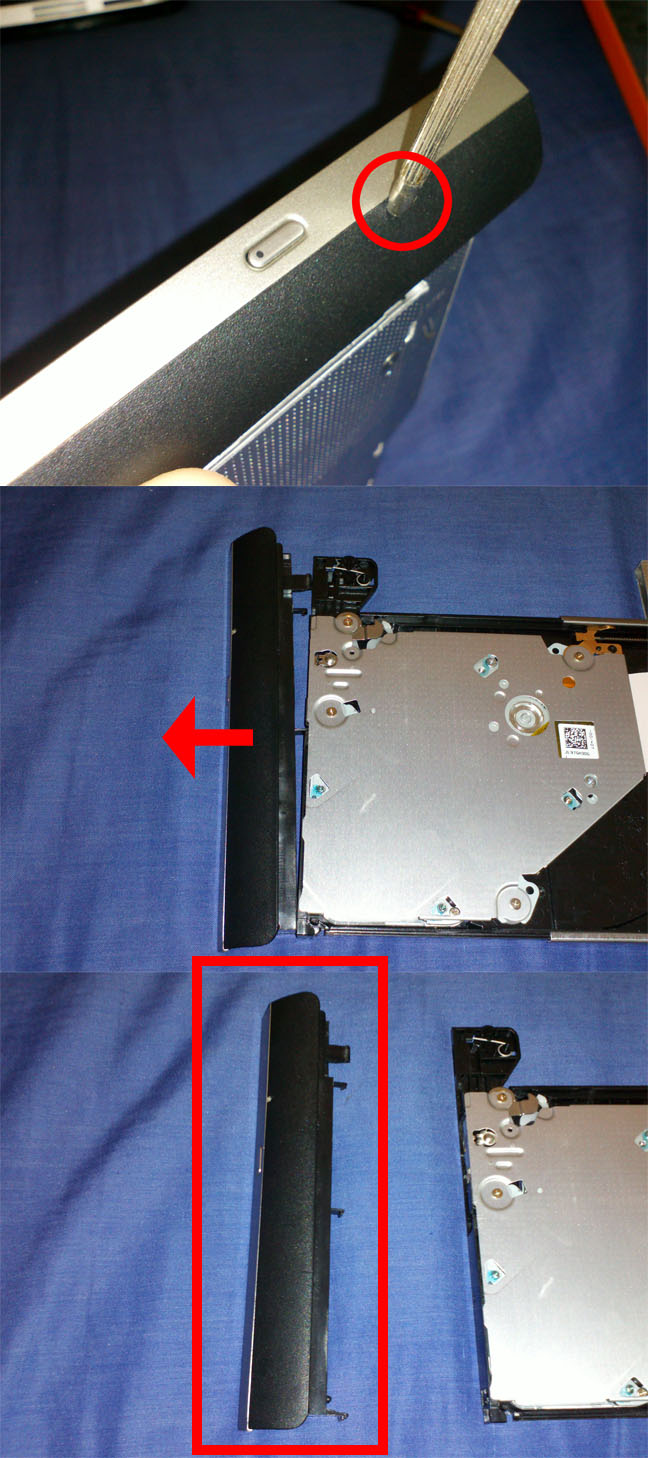
 Now, before we put the caddy into the laptop and screw everything back in place, the caddy’s cover should be removed. This is not necessary, but if you want the outside look to match your laptops’s design, you have to take the cover off of your old ODD. All optical drives have a small hole where you can put a slim screwdriver or paperclip into, that will force the disc tray to eject itself. After its open you may remove the cover from it. Just make sure you don’t break the clips holding it in place, those may also be released with a small screwdriver.
Now that you have the cover free you may stick it into the caddy. They usually come without one, and putting it should be very easy. Mine did come with a cover, but you can pull it out without much effort. Now, attach the hard drive and screw it into the caddy:
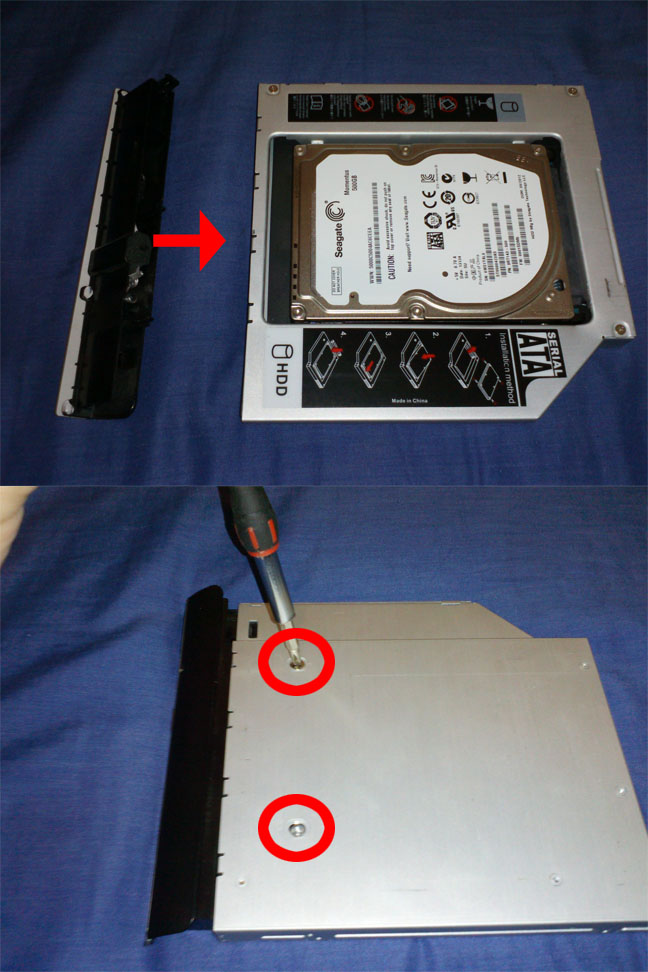
When installing the hard drive, make sure that it slides all the way in, otherwise the SATA power and data connectors might not make good contact and it won’t power on. Depending on your caddy you might be able to screw it even if it’s not correctly connected, so watch out for this.
Finally, that little piece of metal screwed to the back of your ODD has to be removed. It’s necessary as it will prevent the caddy to slide out of your laptop, just as it does with your optical drive. Just unscrew it and screw it back to the caddy in the same spot where it was:

This might look different on each laptop and it might even fit on different positions, so make sure you know how it was placed before you take it off. It’s a common and annoying mistake, and if you put it wrong it won’t fit back into the laptop. You could damage anything that is in its way when putting it back in. It’s not rocket science, just make sure it looks the same as it was.
Now, put all back together and you’re good to go. That’s all you need for the HDD + SSD configuration to work at a hardware level. Next, you’ll want to setup your OS to take the most advantage of your new setup. I’ll cover the basics for a Windows OS. I don’t care if you use any linux distro, hackintosh or whatever, this part is up to you and it’s what I consider an optimal setup. Basically, we’ll make all personal folders like Documents, Music, Videos, etc… store stuff in the HDD instead of the SSD. This is because your actual stuff (not installed programs, games or the OS but your porn, pictures or you call it) will take most of your storage space and we already stated that an SSD doesn’t have the same storage/price ratio of a HDD. What we care about in an SSD is its speed. We want programs to start immediately, the OS to load faster and so on. If you want every single thing to be fast, you might want to buy a larger SSD instead, but that’s not the point of this guide.
Now, I’m assuming that at this point you’ll have your OS installed on the SSD, and the HDD is currently empty. Again, I won’t explain how to do this as it’s the same process as if you were installing the OS on a computer with different partitions or more than one HDD.
Making Windows store your files on the hard drive is quite easy. Just open your personal folder for your current user and right click one folder at a time, selecting the “properties” option:

(That picture is for Windows 7 (or Vista, but I don’t think you’ll be using that), for Windows 8/8.1/10, just open an explorer window and go to the folder with your user name).
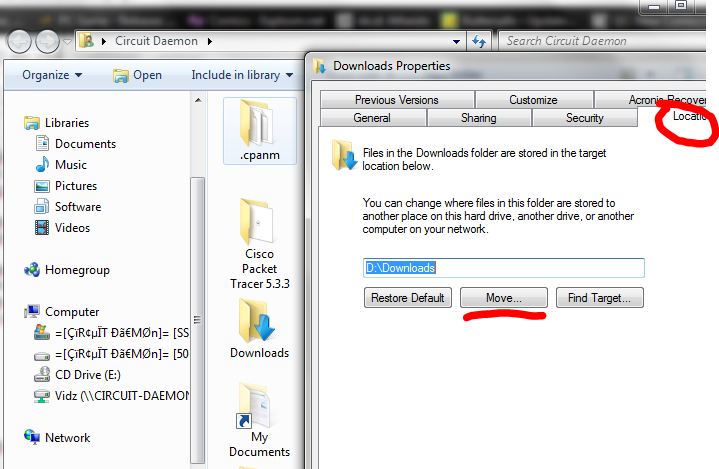
Go to the “Location” tab and then click on “Move”. Navigate to your HDD path, which usually is “D:” if it’s the second drive after the boot drive. You obviously have to initialize/format the HDD before you can use it in Windows (if it’s brand new). If you have used the HDD before, chances are that it’s already formatted and ready to use. It doesn’t have to be empty but I do not recommend that it has an OS installed (unless you know what you are doing, and if so, then you don’t need this part of the guide). Create a new folder for each of the personal folders you don’t want to be stored on the SSD. I recommend doing all of them because even if you don’t use them directly, some programs might store stuff inside them to keep each user’s account in order (like settings, metadata, that sort of thing…). When you click OK, it will ask you if you want to move the old stuff to the new location. That’s up to you. If it’s a brand new OS installation, then there might be nothing to move, so it’s your call. There are other ways to do this, like using TuneUp utilities for example. Or if you wan’t to feel more like a hardcore user, do it directly from the registry. In the end there’s not any difference. You have to be careful if you decide to have things stored this way. If you boot into the OS without the hard drive, you’ll get all sorts of errors about it not being able to find X or Y file (because of course, it’s no longer there). The TuneUp utilities approach (which I haven’t actually checked how it does it) seems to be the easiest if you want to avoid this from happening, as it changes the location values back to the originals if for some reason the hard drive is not connected anymore. It’s not a big issue, but it can happen.
So, what are the advantages of having done all this?
- Faster boot and program loading time.
- Less energy consumption, which translates into longer battery life (I got an extra hour and a half, you might get even more*).
- You get to keep all your stuff because now, you are not restricted by the low storage that an SSD provides.
- It’s easily upgradable. If you want to increase the hard drive size, you can easily copy all your stuff into the new one (keeping the same folder structure), remove the older HDD and replace it with the new one. No need to reinstall the OS or setup folders again. For the SSD, you can do almost the same, just use Clonezilla or Acronis True Image and clone your Windows installation into a new SSD, replace it and you’re good to go.
- Did I say it’s faster?!?!?! I’m serious, SSD’s make things smoth. Whatever it is you do, you’ll notice.
- It’s cheaper than getting a larger SSD.
- Your hard drive’s fragmentation level will be reduced (but of course, not eliminated) because now, unless you do it yourself, most stuff in the background won’t make your files get fragmented as it happens on a computer with a single drive where the OS and programs might be accessing/writing data in the background while you could be doing it at the same time. Having the OS and your data on separate drives will make things easier for you. The SSD on the other hand, won’t be affected even if there’s fragmentation as the seek time for files is almost reduced to 0.
- If you want to reinstall your OS, you may wipe the SSD and your stuff will be on the HDD, so it will greatly reduce the time it takes you to get your system up and running again. No need to copy all your stuff somewhere else and then formatting the drives.
- The time it takes to install your OS and software is considerably lower. I’ve finished a full Windows 7 installation in under 7 minutes, and it could be lower if you run the setup from a non “bottlenecking” interface for your installation media, such as an external USB 3.0 HDD.
*Battery life will of course depend on the way you use the laptop. If you’re constantly accessing files on the hard drive you’ll still get about the same battery life as keeping it spinning is one of the most power hungry things in a laptop. But if you’re doing stuff like web surfing, you’ll notice a significant increase in battery life.
And for the disadvantages:
- You now have 2 devices to watch out for. This is not a big deal for someone who knows his way with computers, but normal users might not understand this concept. No device is perfect and troubleshooting might get a little bit more complex for some people.
- You won’t be able to use optical media anymore. If you decide to put it back in and you had all your personal data stored in the HDD, then you won’t have access to it until you copy it back to the SSD. Not a deal breaker to me but it’s something you might want to consider. Getting an external optical drive is a better option, but at this point with technology and if you already have one on a desktop computer, there is not much point.
- If your laptop doesn’t have easy access to the hard drive and you’re not careful enough, you might void your warranty.
With all that said, I consider this a must for power users. You won’t miss the optical drive and the advantages are very noticeable. It’s not a process for everyone (but it’s not hard, either), but for those of us who hate the current direction that most people are leading our beloved technology, options like this can be the perfect solution. Now you can brag about what you’ve done, but you can’t hold me liable of any damage or whatever happens when attempting this. You’d have to be very stupid to screw this up, but I know there’s people out there that could do it. If you have questions you may contact me, but I won’t explain the basics like installing the OS or using a screwdriver.